Friday, February 7, 2014

Making Challah

Every Friday I make challah, which is a traditional Jewish bread made with eggs. Now my husband and I aren't all that religious, but having a nice sit-down family meal on Friday nights is an important tradition to both of us. And having a nice challah is a part of that.

When I was a little girl, my parents and I went to my Bubbie and Grandpa's house every Friday night for dinner. Either my grandmother or my mother would bring a challah, but they were always store bough. Even after my grandmother passed away, and shabbos dinners moved to my parent's house, the challahs were always from a local bakery.

Before I got married, I'd made challah with my mother once or twice, but we never had the time to do it on a weekly basis. After I got married, I decided that I wanted to be the kind of woman who made her own challah every week.

And you know what, it was a lot easier (and less time consuming) that I thought!

I found a nice recipe on-line at AllRecipes.com and it's still the one I use every week. I'm not going to walk you through the every single step here, because you can just follow the link. Just a tip, I cut the recipe in half. There's only the two of us (unless you count the snake), and we were throwing a lot of bread away at the end of every week.

So, how do you make a challah?


Step 1: Gather all of your ingredients together.


We switched from the 5lbs bags of flour over to the 10lbs bags, because we were going through so much of it. Then my mom bought us a 25lbs bag from Sam's Club for something like $8! Thank you mom!


Step 2: Mix!

We got a KitchenAid stand mixer as a wedding gift. It was something that I had been drooling over for years, but it's a very expensive piece of equipment, and I couldn't justify the cost. But now that I have one, I don't know what I ever did without it!
Another tip, use a rubber-band to hold the "lock" switch in place. Trust me on this one. Especially if you're making a dough, that switch will not stay in place without a little extra help!


Step 3: Raise the Dough

It might take a few hours, but your dough should go from a tiny little ball (like the picture on the left) to an exploded looking dough-balloon (like the picture on the right).


Step 4: Braid!

One thing that I before I braid, is cut the dough in half and stick half in a loaf pan. That way, we'll have bread for sandwiches throughout the week.
It's taken me a long time to perfect my braiding technique, and the only tip I can give is to start in the middle. It might sound crazy, but trust me on this one, it'll come out so pretty!


Step 5: Bake it

The only thing left to do is to bake your challah! It'll be ready to come out of the oven when your whole apartment (or house, or igloo, or whatever) starts to smell like fresh baked bread! It's wonderful, and I've never had to set a timer for my bread!


So there you have it, 5 easy steps to a delicious challah! Enjoy and have a good Shabbos!

Wednesday, February 5, 2014

Kitty Rescue

Hey you guys, this is going to be really quick, I promise.

The other day my friend Colleen rescued a kitty she found wandering around out in the cold.
She took him in, named him Descartes and gave him a safe warm place to sleep. But Descartes is a sick kitty, he has a possible upper repository infection and needs medical care.

Isn't he a cutie-pie?
According to Colleen:
"he needs an exam, neutering, fiv and filv testing, antibiotics and possibly more, we aren't sure yet."


*UPDATE* Descartes is doing very well! He had his check up and is FIV and FILV free! He does have an upper respiratory infection and a bladder infection, but he's on antibiotics and his prognosis looks good!

So click here to help out if you can! Thank you!

Monday, February 3, 2014

KILBY Bookcase Hack

So recently, my husband and I took our very first trip to IKEA. Well, actually my husband had been there a few times before, but it was all new and very overwhelming to me.

We were at the store in search of a couch, which we acquired (more on that soon, I promise), but we also needed some bookshelves. I don't know if they were featured in any of my boring apartment pictures, but I've got boxes and boxes of books just laying around the apartment with no where to put them.

Problem? 
Even though we've been here for over 6 months, the boxes everywhere make it look like we just moved in.

Solution? 
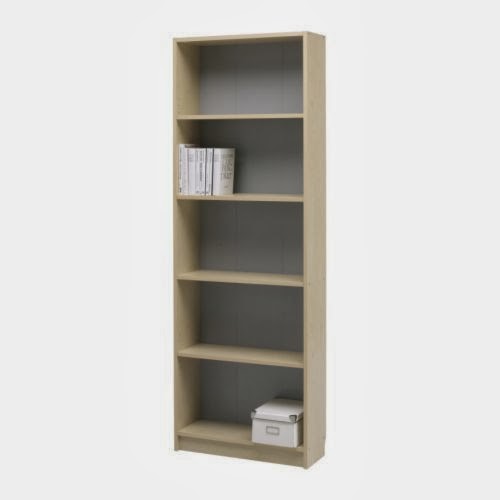
More bookshelves. Specifically, the KILBY bookcase that we found for a steal ($25) at IKEA. 

The new problem? 
It's kind of well, ugly as all get out. See for yourselves:


http://www.ikea.com/us/en/catalog/products/40068154/
The KILBY bookcase from IKEA

What in the name of interior decorating is with that ugly grey backing? It seems to be the only difference between the KILBY and the much more expensive BILLY is that ug-o grey back.

New solution? 
No problem, we'll hack it and make it pretty.

Enter two cans of Krylon Island Splash spray-paint. Only my husband and I are crazy enough to be spray painting outside when it's 20 degrees. We had one of those plastic table-cloth covers and we laid it over the back of our balcony so that we could spray away without worrying about making a mess in our rented space.


It took several coats of paint (we had to run out mid-project to get the second can of paint), and was frustratingly uneven for most of the job. It's been a long time since I spray painted anything, and for some reason I completly forgot how difficult it can be to get everything to come out smooth and even (even if you're using a glossy finish paint). But in the end, everything turned out even better than I had expected.

Check it out:

I call it the KILBY SPLASH

I love our IKEA hack! It adds such a wonderful splash of color to our drab apartment! 


So what's next? We're supposed to be getting a couch and well... stay tuned!


So what do you guys think? Would you "hack" a bookcase like this? Have you? What's your favorite hack? Let us know in the comments!

Thursday, January 23, 2014

DIY Spoon Rest

Now, I know that I've mentioned that I'm staring to get into Pinterest. I've made inspiration 'boards' for every room in our house.

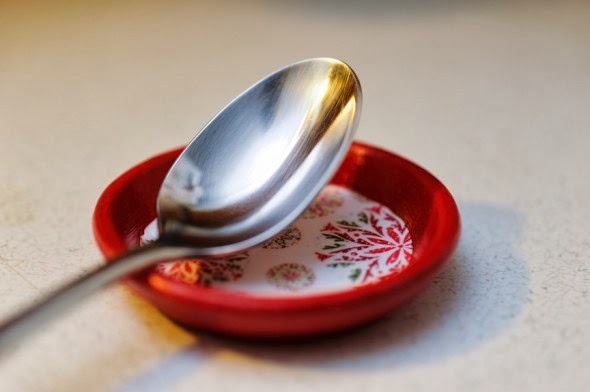
One of the things I 'pinned' to the Kitchen board was this cute little spoon rest:

http://leisejones.com/2012/01/18/spoonrest/
How cute is that?
I pinned it because we desperately need a spoon rest in the kitchen. We do a lot of cooking on the stove, and we just end up getting pasta sauce and such all over the stove-top. :o( I've been looking for a nice spoon rest for a while, but most of the ones I've seen on etsy and such are $20! 20 bucks for a spoon-rest? Are you kidding me? So I figured I'd try my hand at making one. And it was just as easy as I thought it would be! Wanna know how I did it?

Step 1.
Acquire some supplies.


Step 2.
Start Painting:


Step 3.
Cut & Paste:


Then just hit everything up with a few coats of glossy Mod Podge and you're good to go!


I think it actually looks just as nice as the one in the picture! And how often can you say that about a DIY project? So there you have it, my very first Pinterest Project! :o)

Stay tuned for more DIY!


Tuesday, January 21, 2014

What to do about that boring apartment?

I think I mentioned that my husband and I are working on an awesome DIY project for our bedroom. I don't want to spoil the surprise by telling you what it is now, but don't worry, I'll post about it some time soon!

But in the mean time, I've been inspired to take a look at some of the other areas in our apartment that could use that good old DIY touch. To put it simply, our apartment is uh... boring. Yeah, boring. Some areas are even super-boring.

So I've been on Pinterest all morning, pinning like crazy. That's the right verb here right? Pinning? And I'm starting to collect some inspiration for things that I want to change in the apartment.

This is meant to be a pretty short post, but I wanted to share some of the "before" (which implies an "after", I hope) pictures of the problem areas in the apartment.

Boring empty bathroom


Our den, can you see the problem?


Another chunk of den... boring


Family room... desperately in need of a DVD rack

And finally, our kitchen. Yeah...


And now you can see why I'm so desperate to spice things up. The kitchen is particularly bad, mostly due to our lack of a kitchen table. :o( Needs to be fixed. And soon. It's actually our next project after the current top-secret DIYing.

So that's it, stay tuned for updates as they happen!

Friday, January 17, 2014

DC Day 4

We're finally back home in Detroit, and while I'll miss D.C., I'm actually really glad to be home. It's been a long and crazy vacation, but I've loved every minute of it.

Since Wednesday was our last day in D.C., we tried to really make the most of it. For our first stop of the day, we had arraigned a tour of the Talking Books Library (part of the Library of Congress). My husband and his brother have been patrons of the Talking Books Library for many many years, so he was beyond excited to go.

Talking Books players throughout the ages
 
We had an amazing tour and got to see all of the behind the scenes stuff that makes the Talking Books Library run smoothly. We learned about the process for taking a print book and turning it into a talking book, and even got to see the studios where local actors read and record the books! It was all a real treat, and I could tell that my husband loved every minute of it!

Now the Talking Books Library isn't really in the heart of downtown D.C., so we had to hop back on the Metro and head to the mall. Our next stop was the James Madison building of the Library of Congress where I filled out an application and got a library card! Yeah, it's okay to be jealous.
The Library likes to stress that library cards (or "reader" cards) are not souvenirs, they are for researchers only, but I really do plan to use my card when we go to D.C. next year (I hope!).

Our next stop was yet another Smithsonian, this time The Natural History Museum, where we saw lots of amazing exhibits, like the Hope Diamond. They also had mummies, which are my personal favorite!


I can't even begin to tell you how amazing the Natural History Museum was, it really blew my mind. We wandered through the Oceans exhibit, saw about a bazillion different animal skeletons, saw the taxidermied mammals in their hall, and so much more. I got to hold a live Lubber Grasshopper in the Insect Zoo (he tickled my fingers). We also saw a new exhibit on the human genome, which was cool and interactive, but nothing I didn't know.

We didn't see the dinosaurs (we just didn't have time), but we did stop to see the exhibit on early human life, which included this amazing wall of skulls:

The 2nd coolest wall of skulls I've ever seen

The entire museum was amazing, and I highly recommend it if you're ever in the D.C. area. It's well worth spending several hours at. Unfortunately, by that point in the day (in the week really) we were reaching our breaking point. We had been going non-stop for four days, and we were both exhausted. So we decided to call it a day and head back to our hotel to get some much needed sleep before our early-morning flight back home.

And that's it. That's our trip to D.C. in a nutshell. Right now, I'm very glad to be home and getting back to my routine, but at the same time, I can't wait to go back to D.C.
I'm hoping that my husband's job will send him back to the conference next year, and we'll get an opportunity to see all of the amazing things that we missed this time around!


So long D.C., I miss you already!