Showing posts with label Crafting. Show all posts

Friday, August 15, 2014

Pennsic 43 - Recap

Whew, what a week we've had. Or really, what an intense last 3 weeks it's been! I wanted to throw together a quick post to let you all know what I've been up to all this time, and well, here it is.

Let's start with the last week in July. It was the last week of my first semester of Graduate School, and I was finally seeing the light at the end of the tunnel. But with a final due on Wednesday and a final due on Thursday (both reflective papers), it was a busy week indeed. I finally got everything turned in on time, and I was done. Nothing left to do except wait for the grades to come in. Oh, and start packing for the week-long insance camping event that we were leaving for on Sunday. Finals = done, packing, not so much.

I went to a party that Thursday night that one of my co-workers threw at her (beautiful little) house, and we all played a rousing game of Cards Against Humanity. Let's just say I heard a few things I never thought I would hear coming our of my coworkers mouths! (It's a fun game, for terrible people)

Friday I worked, and then we took the day on Saturday to get ready for our week-long camping trip. I know, packing for a week's vacation in one day is really smart... Anyway, we got everything packed up and ready to go for an early departure on Sunday morning.

Okay so, before we continue, I should take a minute to tell you where we went. Remember like a million years ago, when I posted about going to some crazy event called Pennsic? Yup, we did it again! Actually, my husband's only missed 1 year in the last 10, but this was only my second time going. And we both had an absolute blast!

We got to spend time with old friends and (to me at least) new friends. I got to meet a lot of the people that I've been hearing my husband talk about for years, and they were all exactly as I had imagined them. Wonderful, fun, funny and charming people.

I could go through a day-by-day re-cap of everything that we did at Pennsic, but I don't want to bore you. I've already put my family and friends through that kind of torture, and I don't want you nice folks to have to suffer through it as well. So let me give you the condensed version.

Sunday: Un-packing, setting up the tent (which leaked the whole time, greeting people, then a night of amazing performances.

Monday: Field battle, then our first classes of the week (including one by a teacher who I remembered well from 5 years ago). Then we actually got up to the archery range to shoot our War-Points.

Tuesday: It was a fast day, so we planned ourselves a long schedule of classes, which we more or less stuck to.

Wednesday: We went to a bit of East Kingdom Court (it ended up lasting 4 hours) and then: two words, Midnight Madness! Shopping at all of the merchants! We had a blast wandering around all of the different stalls and buying way more stuff than we needed.

Thursday: More classes, then cooking all the things back in camp (including Creme Brulee on the open fire). We ended up staying up until 2 in the morning learning how to make a bow-string.

Friday: Our last day in camp. We went to a class, then packed up and helped take down the camp site. Drove home, and that was all she wrote.

We had an amazing time, hung out with friends, attended some very interesting classes (Like: Historical Uses of Poisons, for one), and made some cool things.

Not to mention got some cool things. Check it out:

A bunny fur and some beautiful hand-spun yarn

All these leather scraps for only $2!

And some lovely linen to make a few nice projects out of!
Pennsic was a blast (I think I've said that before!), and I honestly can't wait to go back next year. But in the mean time, life moves on. Back to the grind!


I'll be back next week with another Librarian's Corner, so stay tuned!

Friday, July 4, 2014

Knitting Entrelac

I've had this post sitting in my "drafts" folder for a very long time now, I think maybe 6+ months. So long that I don't remember why I didn't just sit down and write it in the first place. Maybe I wanted to wait until I was finished with my entrelac scarf? I don't know.

Anyway, I'm still not exactly "done" with my scarf... Okay, I'm not even half way, but I want to write about it! I've done enough (about 21") to really feel like I've got the hang of the method, and I don't see what I can't share what I've learned.

Now, I'm going to be very honest, I am not a knitter. I like to pretend I am, but I really only know a few basic stitches. For those of you who've been following me for a bit, you may remember my cable scarf, which I scraped (or "frogged") numerous times before finally getting the hang of the repeat... That was probably my greatest knitting accomplishment to date, and I still haven't finished it. It's just about as long as it was back in 2012...

So, being just a beginner knitter, when I saw this gorgeous Entrelac Scarf (by Allison LoCicero), I didn't think that I would be able to do it at all. But I got out my needles and some yarn, and I tried it anyway. I first saw the pattern on YouTube, on the channel VeryPink Knits. The video was called (of course) Learn to Knit an Entrelac Scarf.
The video was endlessly helpful in my endeavors to knit this scarf. Being sort of a beginner knitter, I was nervous, but it really isn't nearly as hard as it looks (though feel free to tell you friends how complicated it was when they compliment you on it).

Wanna get started?


Here's What You'll Need to Know:


You should come into this project with a basic knowledge of how to knit and purl (the 2 most basic stitches in knitting). There are a few other techniques that will need to be mastered (or at least learned) in order to make this scarf, but they're not hard, and if you can knit & purl, you can learn them.
They are:

sl (slip one) - to slip a stitch, you put your needle in the stitch purl-wise, then simply move it from the left needle to the right without having worked it. 

kfb (knit-front-back) - you put your needle into the stitch and knit it normally, but before taking the stitch off of the left needle move your right needle into the back loop of the stitch (as if you were going to knit it again), and then wrap and pull them both off. You've turned one knit stitch into two! 

m (make) - to make a stitch, you use your needle to pick up the "bar" between stitches and put it on your right needle. You've just made a stitch out of nothing! 

ssk (slip-slip-knit) - in this scarf, to slip-slip-knit you will slip two stitches (as if to purl) from your left side needle onto your right needle, then knit them together.

psso (pass slipped stitch over) - This isn't as weird as it sounds. Basically, what you're doing is passing a slipped stitch over the next one on the needle, just as you would when you bind-off your work.


You will also (at various times) have to knit or purl two stitches together, but this is very simple to do. Instead of picking up one stitch to work, you just pick up two. Easy as pie.


My recommendations? Read through the pattern, more than once if you need to. Watch the video continuously (I've watched it about 6 times all the way though, and I keep jumping back and forth between sections as I need). And don't be afraid to make mistakes. There are some tricky stitches in this pattern. Just take it slow and don't worry, you can do it!

Before you know it you'll have a beautiful chunk of fabric like this:


So grab your needles and get started! Don't worry if you don't have a long-dyed variegated yarn, use what you've got, it'll be beautiful regardless!


I'd love to see what you guys come up with! You can find me on ravelry.com (feel free to "friend" me!), or as always, you can leave a comment here on the blog. I can't wait to see your projects, and Happy Stitching!


P.S.: Don't worry if your scarf often looks like this:

It's normal, trust me.

Monday, June 16, 2014

Crocheting a Uterus

So uh, I crocheted a uterus. Why? Why the hell not? It's cool as all get out and it didn't seem to hard. So I made one.

I'm not going to get into all of the deatils about the pattern, because its not my pattern. And besides, you can check it out here. You might have to sign up for a ravelry.com account, but don't worry, we don't bite... much.

Anyway, onto the uterus! (I bet you don't hear that phrase very often, do you?).

I had never made anything stuffed before, and I wasn't sure that I would be able to crochet a 3d shape, but it was actually pretty easy.

I started out with the body of the uterus, just crocheting in the round, following the pattern and watching as it started to take shape. The only sort-of tricky part here is that you have to pull the tube at the bottom up into the body of the uterus to make the cervix, but it's actually pretty easy, just follow the pattern carefully and you'll do fine.

Next up were the fallopian tubes, and these were much trickier than the body, if only because they are a lot more narrow, and since I was working with a 5.00 hook, I sometimes had trouble getting my hook in there and stabbing through the right stitches. My advice? Just be patient, count your stitches and use stitch markers, I cannot stress that last part enough.


My un-assembled uterus

The little loopy bits on the end may look tricky, but they're not too bad. I had to google how to do it though, because it's not clear in the pattern. Here's the link I used. Again, it just takes some patients and practice, you'll get it, I promise.

When you're done making all of the bits and parts (and it shouldn't take too long, there's only 3 of them after all), it's time to grab your pipe-cleaners and put the whole thing together! That's right, I said pipe-cleaners.

You stick them through the fallopian tubes, so that there's about 2" sticking out. This will help you attach it to the body of the uterus, and it will also provide some stability for the tubes, otherwise they get all floppy like.

So go ahead and place your tubes fairly high-up on the body of the organ. The pattern calls for a specific placement, and I recommend it. And then just attach them. And guess what? You're all done! You have yourself a crocheted uterus! How cool is that?


very cool indeed
Bonus points if you have a carved skull and a framed picture of the Mütter Museum to put your uterus next to!


So that's it! Go forth and crochet your own uteruses. Uteri? Either way. And I'd love to see what you come up with! Send me some pictures at CarynSKA@gmail.com, or friend me on ravlery.com (you know you want to); CarynSKA. Oooor... Just leave a comment with a link! I'm dying to see what you guys come up with!

Monday, March 17, 2014

Project Sunday 3-16-14

Happy Monday, and Happy St. Patrick's Day to all those who celebrate! And to all those who don't, wear something green anyway, it's not worth getting pinched by strangers.

Here's a quick re-cap of yesterday's Project Sunday activities for you to enjoy:

Yesterday we celebrated the Jewish holiday of Purim. My husband and I went to morning services to hear the reading of the Megillah (the Book of Esther, which tells the story of how the evil Haman wanted to destroy the Jews because a man named Mordechi refused to bow down to him, and how Esther the Queen managed to save her people), and to stuff our faces with delicious food-stuffs.

No, I didn't make these, but don't they look delicious?


Then is was off to a Sudah (Purim party) at my in-law's house, where we stuffed our faces some more with more delicious food-stuffs.
Then it was time to get to work on my father in law's wine press. This is a project that we started working on more than a few months ago, and have been making spotty progress on ever since. It's sort of a slow going project, because we have to be at my in-law's house, and have everyone involved in the mood to work on a project, which doesn't always happen.

Anyway, we finished up the last step of the wine press, and I'm happy to report that it is now in working condition. There are more improvements that we could make, little additions that might improve its performance, but we wanted to hold off until we see how the wine press actually works. And since my in-law's won't be getting their hands on the right grapes until at least September, we might be waiting awhile. Oh well, at least that's another project done! I'd love to write about the press and its construction at some point, so keep an eye out for that.

After that, my exhausted husband and I came home and crashed. We just had no energy to work on our own projects (and it was just too cold outside for the painting we were planning on doing), so we decided to chill out and play video games for a bit.

I got some work done on a personal writing project, but other than that, we had a rather un-productive evening, and I'm okay with that.
Sure, Project Sunday is for working on projects, but we did, and we celebrated one of my favorite holidays on top of it all.

So was this the most productive Project Sunday we've had? No. Was it a fun and relaxing one? YES!

Don't worry, we'll have another Project Sunday coming up next week, so stay tuned!


And I'd love to hear what you guys are working on for your Project Sundays, so let me know in the comments!

Tuesday, March 11, 2014

Anniversary Art

I've mentioned my obsession with Pinterest, right? If I haven't, I guess I just did, and here's a re-cap: I'm obsessed with Pinterest! I'll admit, it took me the longest time to get into, but I'm so glad I did. Because I'm finding so many amazing things.

I've got different "boards" for each room in our apartment, filled with decorating ideas. I've already done a few projects that I found on Pinterest, and I plan on making a lot more, but I wanted to take a few minutes to share one that I'm particularly proud of.

It all started with this pin:

http://www.nalleshouse.com/2013/03/modern-art-for-living-room-part-2.html
 
I don't remember where I found it, but it's from a blog called: Nalle's House. As soon as I saw it I knew that I wanted to try to make one for myself! I pinned the picture to the "Bedroom" board and saved it for later.
 
Fast-forward a month or so. My husband and I were heading out this past Project Sunday to work on that super-secret project that I keep dropping hints about, and we were going to be passing by Michael's. Suddenly I remembered this project idea, and decided that we should pop in to pick up canvas and such. We picked up a two pack of canvas fairly quickly, but the stencils took a bit longer.
 
We browsed for a bit, and finally found a Martha Stewart brand stencil set that was kind of what I had had in mind. The pack came with a complete set of letters and numbers, was in a font that I kind of liked, and was several sizes smaller than what I was looking for... and yeah, for over $17, it just wasn't worth it. 
So I was at a bit of a loss for what to do stencil-wise, when my brilliant husband suggested that I make my own stencils. What an idea! With a bit of poking around in my word processing program, I could pick out any font I liked, and make stencils of almost any size! I picked up a pack of white construction paper for $1.99 (I figured it would make for a sturdier stencil than just printer paper), and we were off!
 
I didn't have a chance to work on my project then, even though it was Project Sunday, because we had other plans, but an evening shift on Monday left me almost the whole day for crafting!
 
I started by printing out the "stencils" I had designed the night before.


Then came the most annoying part, cutting out the stencils. I could have gone about this one of two ways. I could have cut around the numbers (which would have been so much easier), but past experience has taught me that I'm very bad at tracing around things. So, I took the much more tedious route and cut out the numbers. It was obnoxious, but I got it done with only a minimal amount of swearing.
 
Next up was tracing the stencils, and this part actually went pretty quickly, once I found a pencil:
 
It's a little hard to see, but I've outlined the numbers that I'm going to paint
 
 
After that, all I had to do was to color (or paint) in the lines! Now, I'm really not the best painter, so I thought that this was going to be the hardest part. But once I got started, it was pretty damn easy. I just had to have a modicum of patience and a very small brush.
 
Oh right, I forgot to tell you. I decided to make two paintings! Since we got a 2 pack of canvas for such a reasonable price (~$10), I thought, why not? The first painting has the date that we met, and the second one has our wedding date on it. It seemed appropriate, and super cute.
 
And you know what? They came out pretty damn awesome, if I do say so myself.
 
I know it's blurry...
 
Definitely not a Pinterest Fail. And now I'm thinking about making some more of them! They would make great wedding/anniversary gifts, and I've got a few of those coming up.
 
So, uh, that's all for now. Hopefully this mystery project I've been talking about will be finished really soon, because I'm dying to blog about it.
 
Stay tuned!


PS. I promise I'll post a better picture of the finished product as soon as we hang them and get our bedroom just a little more put together!

Monday, February 24, 2014

Project Sunday 2-23-14

I know it's not Sunday anymore, but I was simply too exhausted last night to possibly post this, and I'm going to tell you why.

Sunday is usually the only day of the week that both my husband and myself have free time. So we try to spend almost all of our Sundays working on the myriad of projects that we're occupying our time with. Thus we have dubbed the day Project Sunday. Catchy, right?

So what did we do this past Project Sunday? I'm so glad you asked.

First, since we're planning on going to Pennsic this year (yes, that again) I'm going to need something to wear. You might remember that last time I went to Pennsic, I had to make a bunch of funny looking cloths for myself... Well, I don't know what we were thinking, but they all came out way too big. Over the years, we took in one of the tunics and made it wearable, but nothing else really fit me. So yesterday, we went to a Garb Workshop in our Barrony and fixed up the other two pieces! I'm so excited that now I'll actually have garb that fits me! We spent the whole morning measuring and cutting and sewing and surging, and it was so much fun. There's still a lot of work to be done. One of my tunics needs to be hemmed, and I still don't have any pants, but oh well. Such is life.

After the Garb Workshop, we headed over to my mom's office so that I could do some work, and so my husband could provide some tech support to her. No matter how old your children get, they will always be your precious little IT people.

Next was a trip to my in-law's house to have "dinner" (at 4:00pm) with some friends of theirs, and then to work on a really special project that I can't tell you about now, but that I promise I will blog about as soon as it's finished!

Now you might think that we packed a lot into our Project Sunday, but we weren't done yet! We had the most important project of all waiting for us at home.
We had to finish our thank-you notes! Yes, I know that we've been married for over 6 months, and we haven't done our thank-you notes yet. But guess what? They're all done now! It took about 4 hours of solid work over Saturday and Sunday evenings to hammer out all of the details and write some of the ones we had been putting off. But it got done. I'm going to head out to the post office today to mail them! (then I just have to worry about my grad-school apps... yay)

And that was really the end of a very long, yet very productive Project Sunday. What will we get done next time?
Stay tuned and find out!

Thursday, January 23, 2014

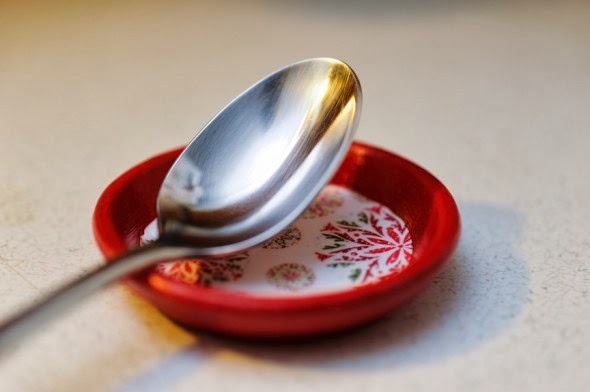
DIY Spoon Rest

Now, I know that I've mentioned that I'm staring to get into Pinterest. I've made inspiration 'boards' for every room in our house.

One of the things I 'pinned' to the Kitchen board was this cute little spoon rest:

http://leisejones.com/2012/01/18/spoonrest/
How cute is that?
I pinned it because we desperately need a spoon rest in the kitchen. We do a lot of cooking on the stove, and we just end up getting pasta sauce and such all over the stove-top. :o( I've been looking for a nice spoon rest for a while, but most of the ones I've seen on etsy and such are $20! 20 bucks for a spoon-rest? Are you kidding me? So I figured I'd try my hand at making one. And it was just as easy as I thought it would be! Wanna know how I did it?

Step 1.
Acquire some supplies.


Step 2.
Start Painting:


Step 3.
Cut & Paste:


Then just hit everything up with a few coats of glossy Mod Podge and you're good to go!


I think it actually looks just as nice as the one in the picture! And how often can you say that about a DIY project? So there you have it, my very first Pinterest Project! :o)

Stay tuned for more DIY!


Tuesday, January 7, 2014

What to do about those drafty windows... (part 1)

I don't know if I've mentioned this before, but my husband and I live in an apartment. Now, my husband is just about the most handy guy I know. I literally believe that he can fix anything, but he is not used to living in an apartment. He's used to having a house, where if sometime breaks you just fix it.

So when we noticed that every single window in the apartment was drafty what was my husband's first thought?
Oh, I'll just caulk and re install the molding. No big deal.

Um, yes big deal. I really don't think that the leasing office will be thrilled with you taking apart their windows, even if you will fix them.

So we did what normal people do, and we contacted the leasing office to see if we could have their maintenance people come and take a look at it. This is what they said:

"With the draft in your windows we refer you to go to lowes because they have an actual window insulation kit there that is super easy to put up."

Uh.. what? Really, we have to do it ourselves? Can't you at least send someone out to take a look? Nope, apparently not. Thanks.

So what did we do? Well, we went to Lowe's. There's one right next to the apartment complex and like I said, my husband knows his way around a power tool or two. We went and picked up some foam insulation and we installed it in the windows. We picked up one roll and were able to take care of most of the windows in the apartment.

during all of this, we were also dealing with a thermostat issue (that didn't get solved, but got dealt with), so between those two big changes we made, we were really hoping to see some improvements in our heat situation. I mean, we had a window problem, the management told us to get a foam insulation kit at Lowe's & fix the problem ourselves. We did everything they told us to do, so that should have fixed the problem... right?

Wrong:
Can you see the ICE? I can...
This is the picture that we took after we had already added the foam insulation... Ugh. We contacted the management again to see if they would send someone out to take a look at the problem. Because to me, frost/ice on the inside of the windows kind of seems like a problem.

This time the management did send someone (we had another un-related issue that needed to be looked at as well). I wish I had kept the work-order sheet or at least taken a picture, because the adive was priceless.

Put plastic up!

Thanks... thanks a lot.


Stay tuned, there's more to come.


Friday, December 27, 2013

Hand Made Knitting Needles


         Recently I decided that I really needed to brush up on my knitting skills, so I decided to make a few of Staci Perry's Traditional DishCloths in order to practice some of the basic skills (and pick up a new trick or two in the process). Her pattern calls for size 7 knitting needles, which I discovered… I don’t have.

         I have a set of five size 5 double-pointed needles and a set of straight size 9 needles which are still being used for another project (the cable scarf, if you must know), so I decided to use the 5s. I thought it would be a good way to practice using double pointed needles. And I was right. It was great practice, and the dish cloths came out fabulous, if a bit small.


         Fast-forward a few days, I was talking about the project with one of my friends at work who is also a knitter (though at a much higher skill level than I). She mentioned that I could just go out and buy myself a set of size 7 needles. She’s right, I could… but I didn’t want to spend the money. Especially since I don’t know what else I might use that particular size for in the future. I would rather wait until I had another specific project in mind.

Then a day or two later, she sent me this video:


         OMG! I didn’t even realize you could make knitting needles yourself! I had to try it! My husband and I were at Lowe’s picking up some items for another project we’re working on (Don’t worry, there’ll be a post about it!) and I decided to grab a dowel to try to make me some needles with!

         I still wanted size 7 needles, which are also known as 4.5mm. Unfortunately, I live in a country that had not yet embraced the Metric system, so I had to convert to inches. The closest measurement we were able to find was a 3/16in dowel. I think that’ll end up being a size 7.5ish needle. Close enough for $0.65. The next thing to do was to decide how long I wanted my needles to be. I like my knitting needles on the long side, so I cut my dowel down into four 11” pieces, with a few inches left over for a cable needle. I used a small hand-saw and it took about 2 min altogether.

         At this point, we were at my in-law’s house, “borrowing” their basement work-shop for that other project I mentioned. So I went up to my mother in law’s studio to “borrow” her electric pencil sharpener to sharpen up the ends of my needles. I didn’t really need four 11” double pointed needles, but it seemed easier than trying to find some sort of "bobble" to put on the other end...
          Next up was some medium-grain sandpaper (we didn’t happen to have any fine-grain laying around, but it would have been nice) to smooth everything down. I thought that this process would be tedious and annoying, but it actually went really quickly. In no time at all I had everything sanded smoooooooth. 

Knitting needles drying...
         Time to break out the Polyurethane. This stuff smells, and I would recommend working in a room with good ventilation (or outside if possible). We were still in the basement, and lazy, so we stayed put for it. Luckily, this also went pretty quickly. I just brushed on a few layers of the stuff and then set the needles down to dry. Since my needles are so long, I decided to Polyurethane them in two parts. I brushed one side, let it dry on the clean side, then flipped them over and did the same thing on the other half. The can of Polyurethane recommended letting the stuff dry for 3-4 hours between coats, which we did not do. I only waited about 30 minutes between finishing one half of the needle and finishing the other half. But we had pretty ideal drying conditions and only one very thin coat to do.1
          So I got my needles home... and they weren't quite done yet. No big deal, I just sanded them down again (even smoother this time) and hit them with another coat of Polyurethane. Perfect. Except, of course, they're not.
       This is my first attempt at making knitting needles, and of course, nothing is ever perfect. I'm really happy with the way these came out, but I can already think of some tweaks and improvements for next time. For example, these came out super-freaking pointy. Like, stab someone pointy. So next time I think I'll use one of those dinky little plastic pencil sharpeners to get a duller point. I can always sand it smooth. I would also use a prettier wood next time. We used poplar this time, but for ~$0.50 more, I think I can spring for oak.

Okay, so here's the finished product:

Four size 7.5ish knitting needles and a matching cable needle.


         They look nice, don't they? I'm pretty proud of them. Again, they're not perfect, but I'm happy... I might take some bolt cutters, chop the tips off and sand them down again but... I really am very proud of these, and pretty darn happy with the way they came out. They weren't hard to make, and a hell of a lot cheaper than buying new knitting needles!


Happy Crafting!


1. Tip: put your brush in a plastic baggie and stick it in the freezer between coats of the Polyurethane, it’ll keep the brush from drying and getting hard as a rock.

Tuesday, December 17, 2013

Very Simple Pot-Holder

         I've been making a lot of pot-holders lately, and I thought that it might be nice to share the pattern. It's super easy, and you do not have to be an advanced crocheter to learn it. It's actually a great pattern for learning or practicing the single crochet stitch, and when you're done, you've got something that can actually be used. Plus, this project is a great way to use up any scrap yarn you have laying around the house!


Very Simple Pot-Holder


Materials:
         Any 2 colors of yarn (it helps if they are both the same type of material and weight)
         A hook size of your choosing
         A tapestry needle (for sewing in loose ends)

For this example, I used white and blue worsted-weight yarn (this is scarp yarn, and I have long since lost the labels, so I don't know exactly what kind of yarn I'm working with), and a size J (6.00mm) hook. 

The size of your pot-holder is going to depend a few things. 1, how bulky your yarn is. 2, what size hook you choose to work with, and 3, how many chains you start out with. All of the pot-holders I've been making have started with a chain of 21 stitches, so let's start there, shall we?

Use both of the colors of yarn to Chain 21:


Row 1:
Work a single crochet into each of your chains (skipping the first chain off of your hook) for a total of 20 single crochets. Chain 1 and turn.


Row 2:
*Work a single crochet into each of the single crochets from the previous rows (going through the entire stitch), totaling 20 single crochets.*
Row 3 - ?
Repeat everything between the asterisks until the pot-holder is the size you'd like it to be.

And that's pretty much it! When you're finished, just pull the working yarn through the loop on your hook to finish it off, and use your tapestry needle to weave in the ends. All done!

I like my pot-holders to be square, but I can't really be bothered to count rows, so I simply fold my work-in-progress in half along the diagonal, and when both sides are even, I'm done!*


So that's it. I'm having a blast making these pot-holders, and I hope you guys will too! If you have any pattern corrections or suggestions (believe it or not, this is my first time writing up a pattern), please let me know!

Happy stitching!


*A note on finishing: A lot of people like to block their finished crochet/knitting pieces, and I do too! I just haven't been bothering to block my pot-holders, and you'll probably find that you don't need to either. With some regular use, they'll end up blocking themselves.